Vinyl Shirt Placement Guide Printable
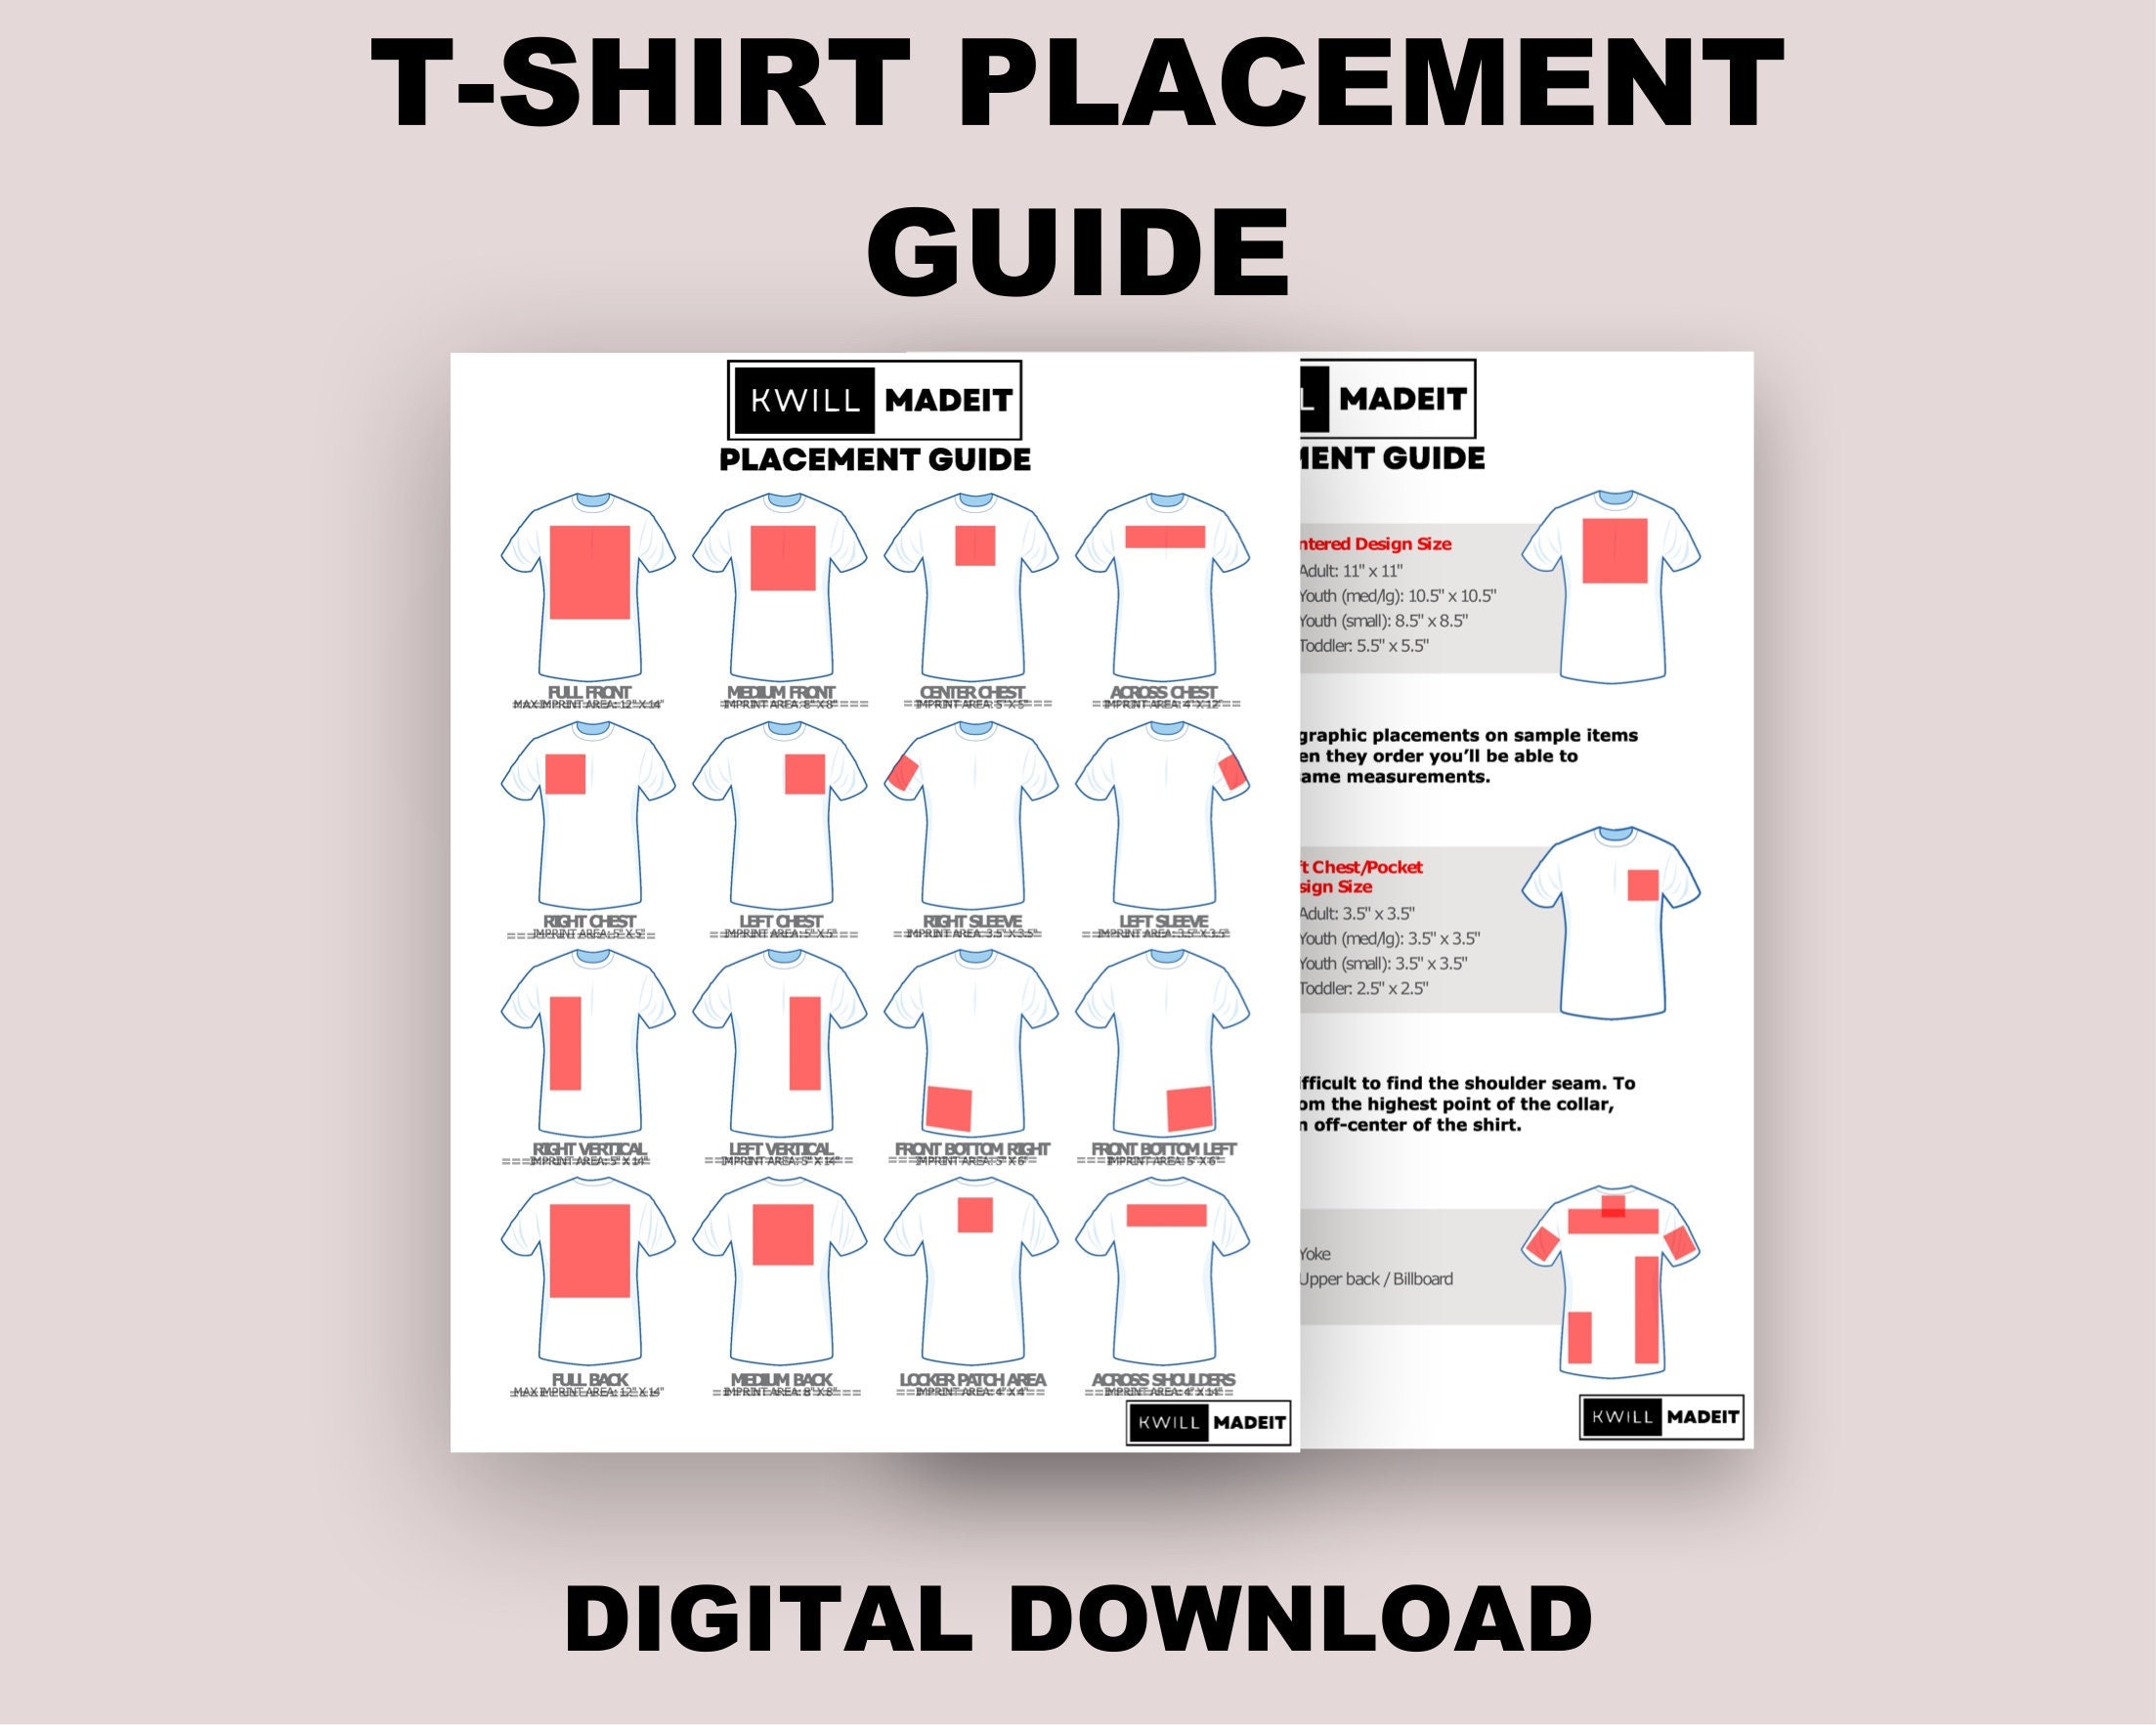
Vinyl Shirt Placement Guide Printable - Thin stripe black & white heat transfer vinyl. Web 3.5 to 4 from center’s edge and 6 to 8 from the seam of the left shoulder. Typically 3” to 4” wide, and around 3″ down from the collar. Iron on your vinyl design to your shirt. We’ll cover three primary print placement metrics: If the design is too low, it can end up in the breast or stomach area for some women. If yoa have aoy : This is the most natural and visually appealing placement. Web print shirts with confidence that the designs are straight and in the right spot. Adult 11 x 11 youth (med/lg) 10.5 x 10.5 youth (small) 8.5 x 8.5 toddler 5.5 x 5.5 centered design placement. We’ll cover three primary print placement metrics: Perfect to size designs on all shirts. (please note this is just a guide some sizes of htv may work better) categories: Web inkjet printable vinyl (check out my guide to printable adhesive vinyl here.) gold chrome metalized vinyl. Use my 50% rule to get the right decal size for shirts. Typically 3” to 4” wide, and around 3″ down from the collar. Adult 3.5 x 3.5 youth (med/lg) 3.5 x 3.5 youth (small) 3.5 x 3.5 toddler 2.5 x 2.5 left chest/pocket design placement. Web now on to the top 8 print locations and the standard size and placement for each: Place top of design 1.5 below neckline. Perfect to. Web 3.5 to 4 from center’s edge and 6 to 8 from the seam of the left shoulder. Adult 3.5 x 3.5 youth (med/lg) 3.5 x 3.5 youth (small) 3.5 x 3.5 toddler 2.5 x 2.5 left chest/pocket design placement. We’ll cover three primary print placement metrics: Short sleeve 1 up from bottom sleeve hem standard size: (please note this. Web center the design in the upper chest area. Web step one, when making craft projects, is always to measure the surface you are placing the design on. Short sleeve 1 up from bottom sleeve hem standard size: If you are designing a shirt and you’re not sure how big to make it, grab a shirt out of the closet. Web click here to download a printable pdf of our placement guidelines. Web 3.5 to 4 from center’s edge and 6 to 8 from the seam of the left shoulder. 3.5 wide youth name back. We’ll cover three primary print placement metrics: Web center the design in the upper chest area. I hope you enjoy it! Web now on to the top 8 print locations and the standard size and placement for each: My example shirts use one layer, but for extra help on vinyl alignment in a more than one piece design, check out my tutorial on how to layer vinyl. Print dimensions, print size dimensions, and find out what. Typically 3” to 4” wide, and around 3″ down from the collar. I always struggle trying to remember which size works best for different sized shirts. Web 3.5 to 4 from center’s edge and 6 to 8 from the seam of the left shoulder. Web to find the correct placement for a heat transfer vinyl pocket size decal, lay the. Web step one, when making craft projects, is always to measure the surface you are placing the design on. Top of the design 3 to 3.5 from the bottom of neck's edging. Web center the design in the upper chest area. Perfect to size designs on all shirts. I hope you enjoy it! Etched glass vinyl (check out my guide to using etched glass vinyl here.) clear transfer tape. Measure the area available to you for placing your design. Use my 50% rule to get the right decal size for shirts. I designed this chart on my ipad for easy memory and now i am sharing it with you. You can print these. If yoa have aoy : Top of the design 3 to 3.5 from the bottom of neck's edging. Adult 11 x 11 youth (med/lg) 10.5 x 10.5 youth (small) 8.5 x 8.5 toddler 5.5 x 5.5 centered design placement. Print dimensions, print size dimensions, and find out what an anchor point is. Thin stripe black & white heat transfer vinyl. Web 3.5 to 4 from center’s edge and 6 to 8 from the seam of the left shoulder. Web center the design in the upper chest area. 5” to 12” wide depending on logo. Web to find the correct placement for a heat transfer vinyl pocket size decal, lay the shirt out flat. Tshirt ruler svg bundle, tshirt alignment tool svg, centering tool template, vinyl placement guide, t shirt ruler adult kids,file for cricut. Top of the design 3 to 3.5 from the bottom of neck's edging. Web click here to download a printable pdf of our placement guidelines. Typically 3” to 4” wide, and around 3″ down from the collar. 3.5 wide youth name back. This is where the top of your design should fall. You want the design on the left side of the chest. We’ll also look into the specifics of how to print images on shirts, including: Adult 11 x 11 youth (med/lg) 10.5 x 10.5 youth (small) 8.5 x 8.5 toddler 5.5 x 5.5 centered design placement. Iron on your vinyl design to your shirt. Measure the area available to you for placing your design. Web print shirts with confidence that the designs are straight and in the right spot.
graphic placement grid for youth tshirt Cricut projects vinyl

Tips for design image placement when customizing apparel! Custom

Heat Transfer Vinyl Sizing & Placement Chart PNG SVG Etsy Cricut

Tips for Heat Transfer Vinyl Shirt Decal Placement Silhouette School

Tips for heat transfer vinyl shirt decal placement Artofit
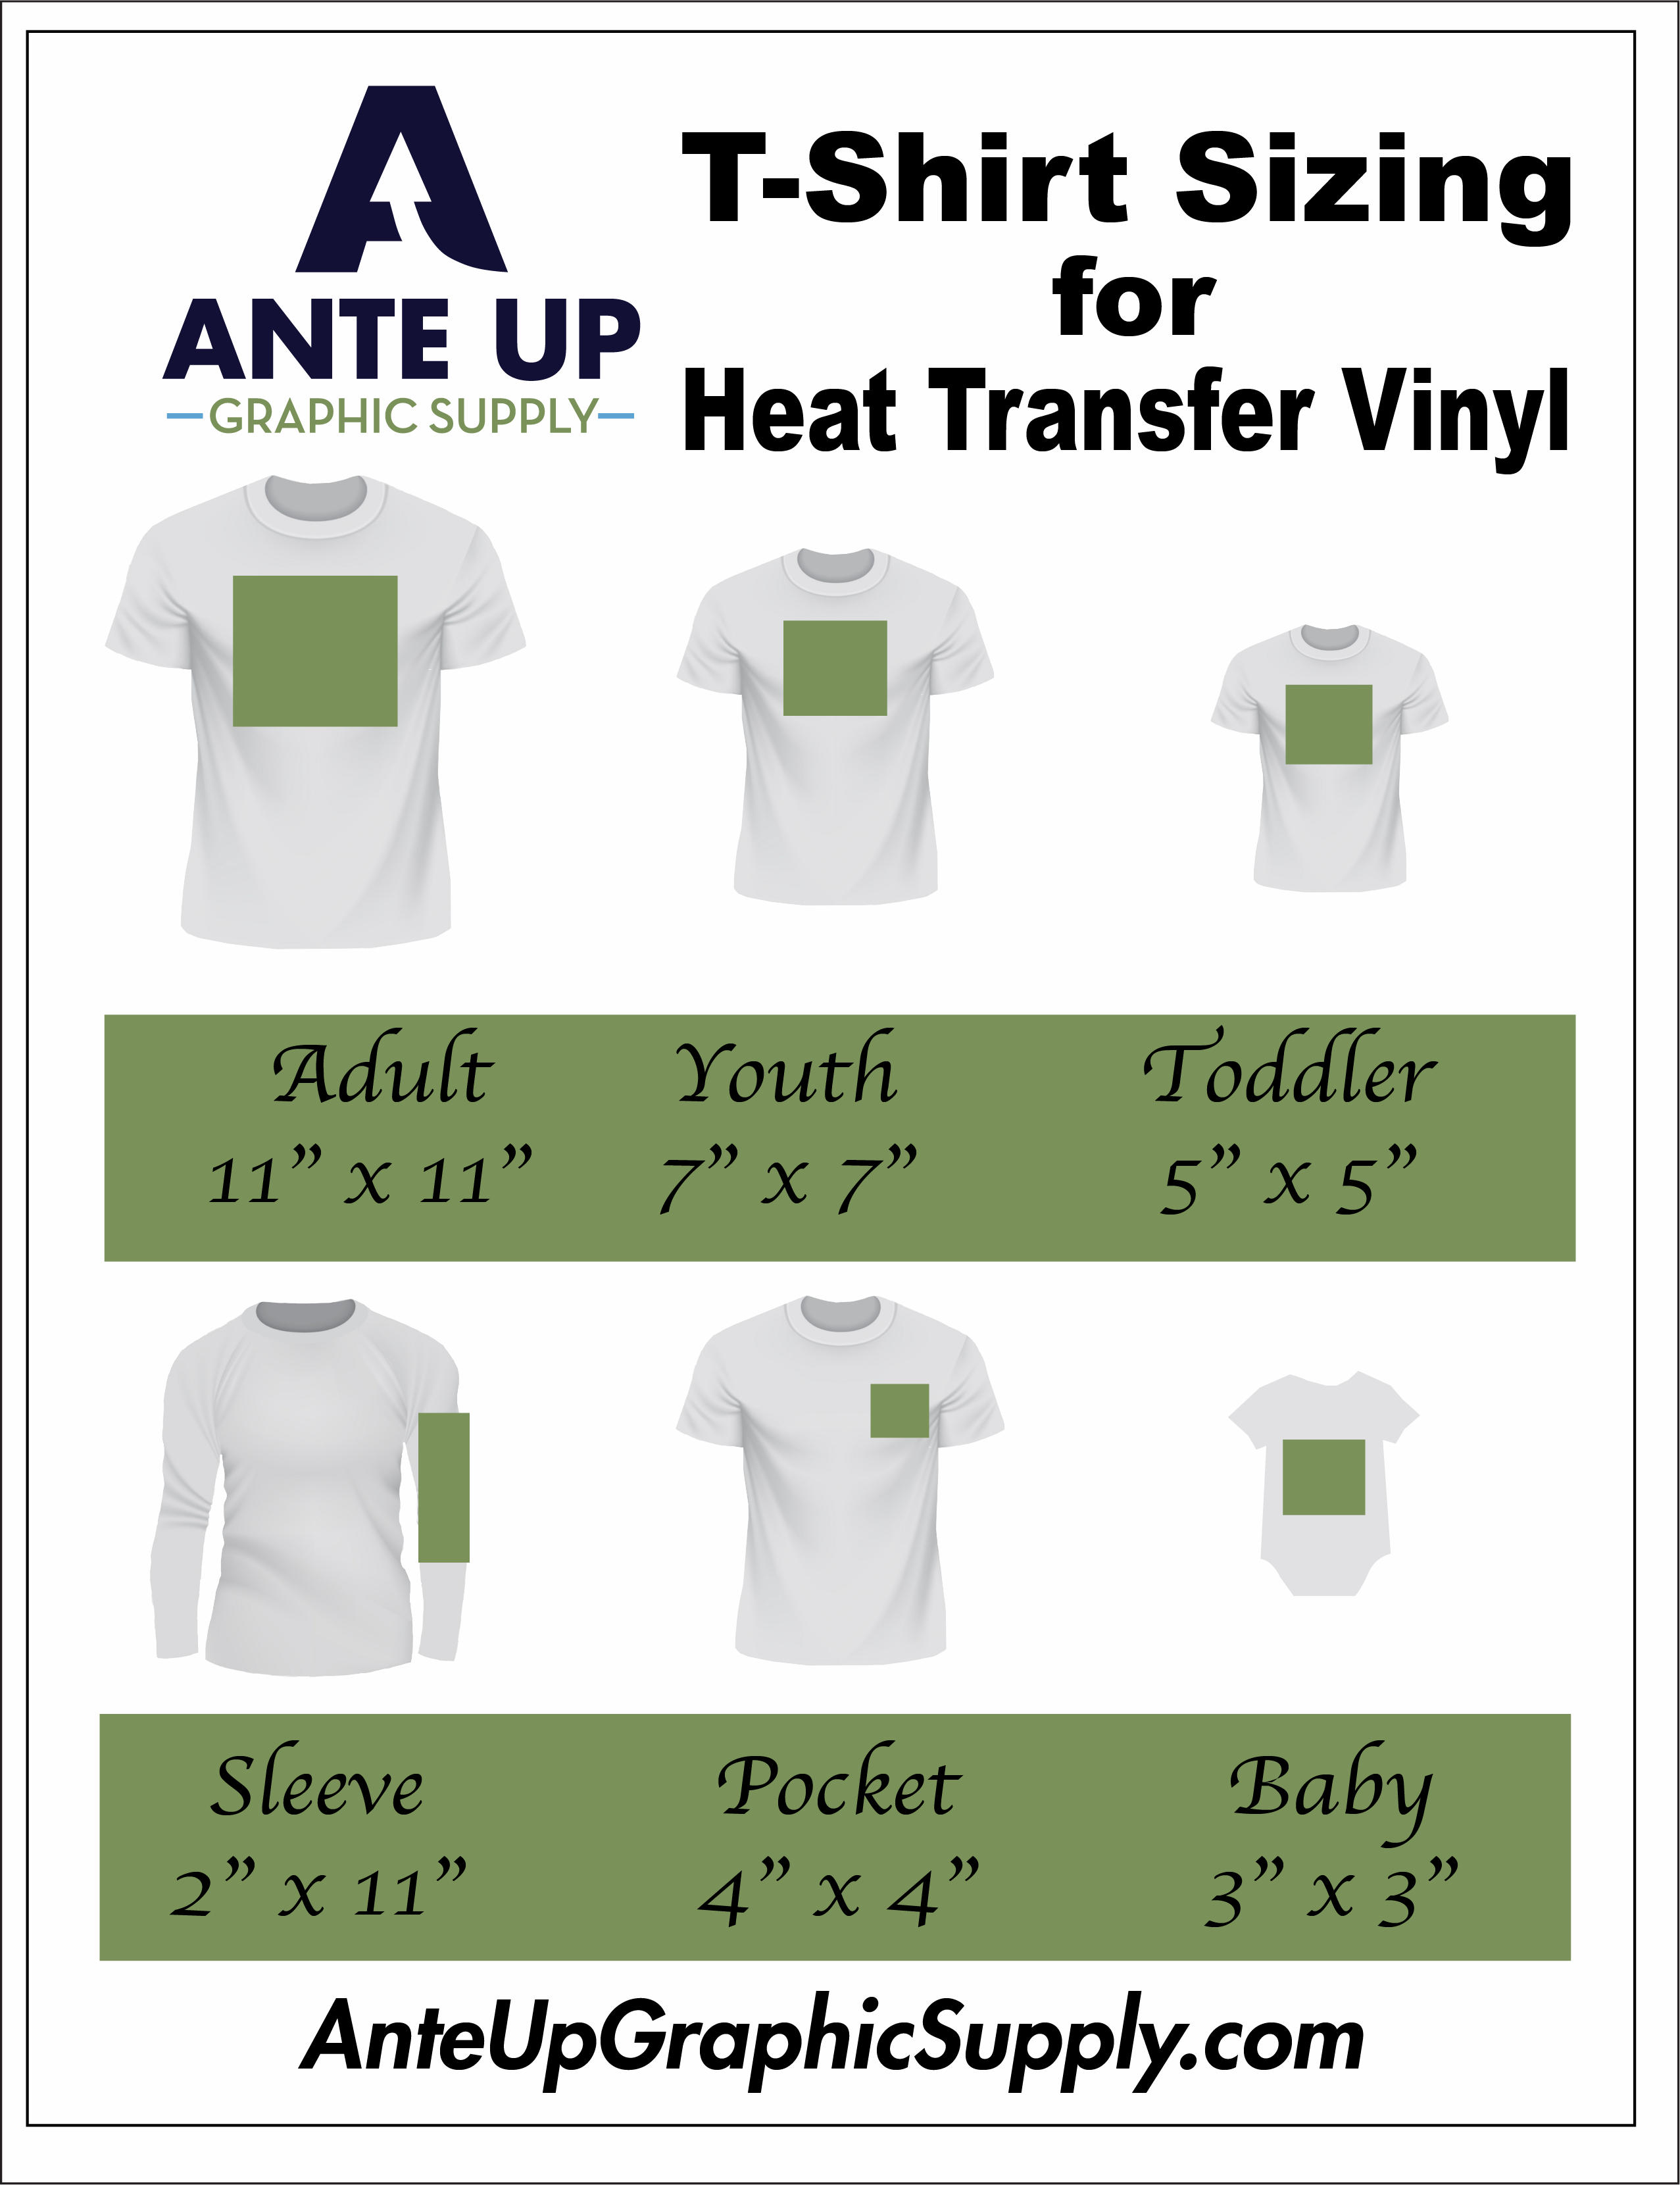
TShirt Design Size and Placement Chart Ante Up Graphic Supply

Tips for Heat Transfer Vinyl Shirt Decal Placement Silhouette School
Tshirt Placement Guide Vinyl Placement Heat Transfer Vinyl Etsy

Decal placement Vinyl shirts, Cricut tutorials, Cricut

Vinyl Shirt Placement Guide Printable
If The Design Is Too Low, It Can End Up In The Breast Or Stomach Area For Some Women.
Perfect To Size Designs On All Shirts.
Thin Stripe Black & White Heat Transfer Vinyl.
My Example Shirts Use One Layer, But For Extra Help On Vinyl Alignment In A More Than One Piece Design, Check Out My Tutorial On How To Layer Vinyl.
Related Post: